


CSS
Cascading Style Sheets is a language for creating style sheets that describe the layout and appearance of markup-language documents. It offers strong control over how an HTML document is presented.
What Are Selectors?
Selectors are a component of the CSS rule set. The content you want to style is chosen using CSS selectors. CSS selectors choose HTML components based on their id, class, type, attribute, and so forth.
Types of Selectors.
In CSS, selectors come in a variety of distinct forms few are explained below.
1. Universal Selector
To pick every element in an HTML document, we use the universal selector. It also includes other elements which are inside under another element.
<!DOCTYPE html>
<html>
<head>
<style>
* {
  color: white;
  background-color: black;
}
</style>
</head>
<body>

<h1>Hello world!</h1>

<p>Lorem ipsum dolor sit amet, consectetur adipiscing elit, sed do eiusmod tempor incididunt ut labore et dolore magna aliqua. Ut enim ad minim veniam, quis nostrud exercitation ullamco laboris nisi ut aliquip ex ea commodo consequat. </p>

<p id="para1">Augue mauris augue neque gravida in fermentum et sollicitudin. Lacus vestibulum sed arcu non odio. At augue eget arcu dictum varius. Amet porttitor eget dolor morbi non arcu risus.</p>

<p>Blandit cursus risus at ultrices. At consectetur lorem donec massa sapien faucibus et molestie ac. Dignissim diam quis enim lobortis scelerisque fermentum dui faucibus. Cursus turpis massa tincidunt dui ut ornare lectus.</p>

</body>
</html>
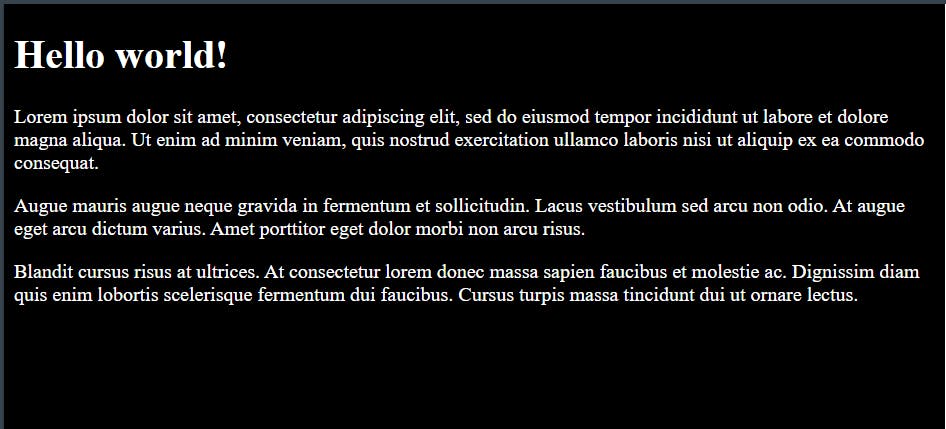
The universal selector is used in the HTML code above along with the subsequent code.
* {
  color: white;
  background-color: black;
}
Output:
2. Individual Selector
To pick an individual or group of individual elements in an HTML document, we use the Individual Selector.
<!DOCTYPE html>
<html>
<head>
<style>
p {
    background-color: #C7C11A;
}
</style>
</head>
<body>

<h1>Hello world!</h1>

<p>Lorem ipsum dolor sit amet, consectetur adipiscing elit, sed do eiusmod tempor incididunt ut labore et dolore magna aliqua. Ut enim ad minim veniam, quis nostrud exercitation ullamco laboris nisi ut aliquip ex ea commodo consequat. </p>

<p id="para1">Augue mauris augue neque gravida in fermentum et sollicitudin. Lacus vestibulum sed arcu non odio. At augue eget arcu dictum varius. Amet porttitor eget dolor morbi non arcu risus.</p>

<p>Blandit cursus risus at ultrices. At consectetur lorem donec massa sapien faucibus et molestie ac. Dignissim diam quis enim lobortis scelerisque fermentum dui faucibus. Cursus turpis massa tincidunt dui ut ornare lectus.</p>

</body>
</html>
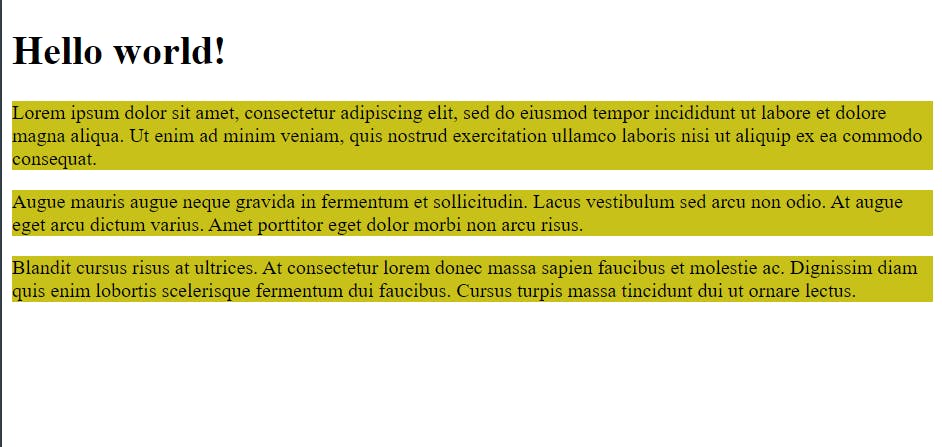
The individual Selector is used in the HTML code above along with the subsequent code.
p {
    background-color: #C7C11A;
}
Output:
3. ID Selector
Since an id is always distinct within a page, it was decided to pick a single, distinctive element. An HTML element can be chosen by its id attribute using the id selector.
<!DOCTYPE html>
<html>
<head>
<style>
#para1 {
    text-align: center;
    color: blue;
}
</style>
</head>
<body>

<h1>Hello world!</h1>

<p>Lorem ipsum dolor sit amet, consectetur adipiscing elit, sed do eiusmod tempor incididunt ut labore et dolore magna aliqua. Ut enim ad minim veniam, quis nostrud exercitation ullamco laboris nisi ut aliquip ex ea commodo consequat. </p>

<p id="para1">Augue mauris augue neque gravida in fermentum et sollicitudin. Lacus vestibulum sed arcu non odio. At augue eget arcu dictum varius. Amet porttitor eget dolor morbi non arcu risus.</p>

<p>Blandit cursus risus at ultrices. At consectetur lorem donec massa sapien faucibus et molestie ac. Dignissim diam quis enim lobortis scelerisque fermentum dui faucibus. Cursus turpis massa tincidunt dui ut ornare lectus.</p>

</body>
</html>
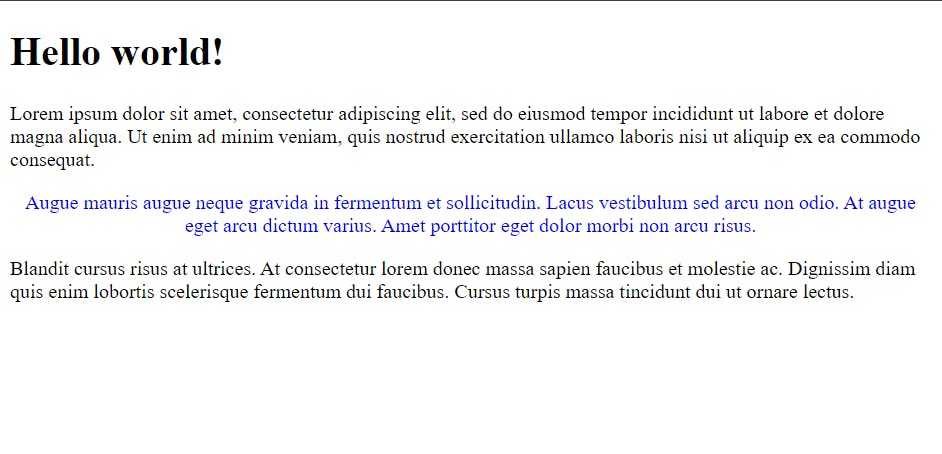
The ID Selector is used in the HTML code above along with the subsequent code.
#para1 {
    text-align: center;
    color: blue;
}
Output:
4. Class Selector
HTML components having a specific class attribute are chosen using the class selector. It is used with a period character (.) and the class name after it.
<!DOCTYPE html>
<html>
<head>
<style>
.center {
  text-align: center;
  color: red;
}
</style>
</head>
<body>

<h1 class="center">Hello world!</h1>
<p>Lorem ipsum dolor sit amet, consectetur adipiscing elit, sed do eiusmod tempor incididunt ut labore et dolore magna aliqua. Ut enim ad minim veniam, quis nostrud exercitation ullamco laboris nisi ut aliquip ex ea commodo consequat. </p>


</body>
</html>
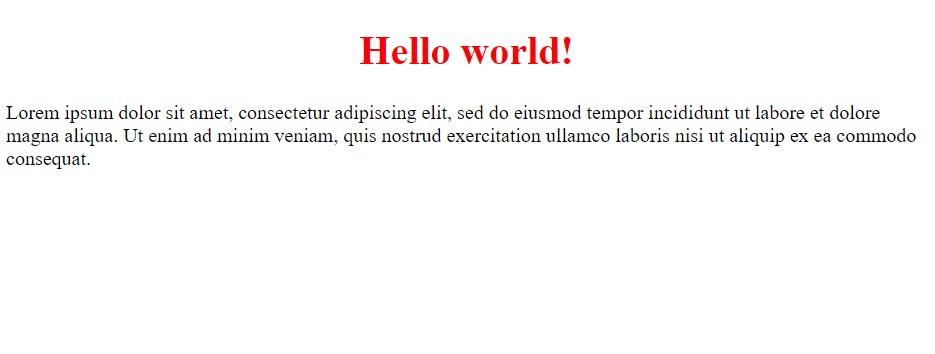
The Class Selector is used in the HTML code above along with the subsequent code.
.center {
  text-align: center;
  color: red;
}
Output:
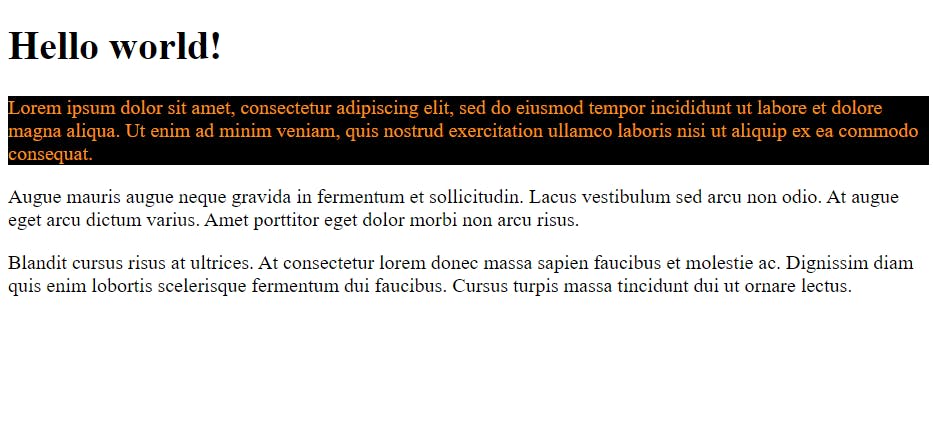
5. Chained Selector (And Selector)
It is a set of phrases and patterns that instruct the browser which HTML elements to pick in order to apply the CSS property values contained in the rule to them.
<!DOCTYPE html>
<html>
<head>
<style>

p.bg-black.text-white{
    background-color: #000;
    color: #ef9323;
}

</style>
</head>
<body>

<h1>Hello world!</h1>

<p class="bg-black text-white">Lorem ipsum dolor sit amet, consectetur adipiscing elit, sed do eiusmod tempor incididunt ut labore et dolore magna aliqua. Ut enim ad minim veniam, quis nostrud exercitation ullamco laboris nisi ut aliquip ex ea commodo consequat. </p>

<p id="para1">Augue mauris augue neque gravida in fermentum et sollicitudin. Lacus vestibulum sed arcu non odio. At augue eget arcu dictum varius. Amet porttitor eget dolor morbi non arcu risus.</p>

<p>Blandit cursus risus at ultrices. At consectetur lorem donec massa sapien faucibus et molestie ac. Dignissim diam quis enim lobortis scelerisque fermentum dui faucibus. Cursus turpis massa tincidunt dui ut ornare lectus.</p>

</body>
</html>
The Chained Selector is used in the HTML code above along with the subsequent code.
p.bg-black.text-white{
    background-color: #000;
    color: #ef9323;
}
Output:
6. Direct Child Selector
It picks out any HTML element that is the immediate child of any HTML element that is the target of the selector placed before the greater than character (>) and is targeted by the greater than character.
<!DOCTYPE html>
<html>
<head>
<style>

div > section > li {
    background-color: #7667e4;
}

</style>
</head>
<body>

<h1>Hello world!</h1>
<div>

<section>

    <li>highlight me</li>

<p class="bg-black text-white">Lorem ipsum dolor sit amet, consectetur adipiscing elit, sed do eiusmod tempor incididunt ut labore et dolore magna aliqua. Ut enim ad minim veniam, quis nostrud exercitation ullamco laboris nisi ut aliquip ex ea commodo consequat. </p>

</section>
</div>
</body>
</html>
The Direct Child Selector is used in the HTML code above along with the subsequent code.
div > section > li {
    background-color: #7667e4;
}
Output:

7. Sibling Selector
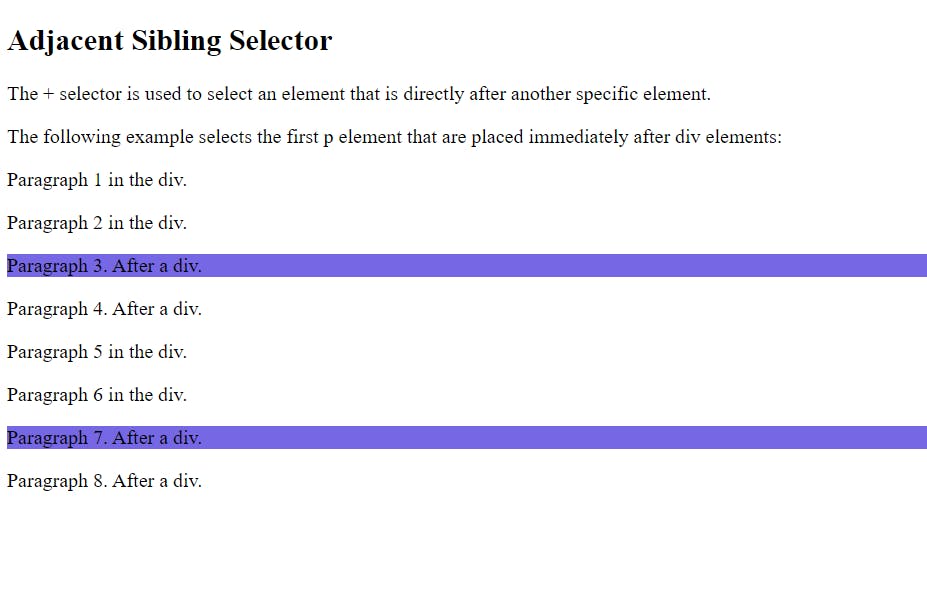
7.1 Adjacent Sibling Selector (+)
The adjacent (immediately following) sibling selector is used to choose an element that exactly follows another particular element. The parent element of each child element must be the same.
<!DOCTYPE html>
<html>
<head>
<style>
div + p {
  background-color: #7667e4;
}
</style>
</head>
<body>

<h2>Adjacent Sibling Selector</h2>

<p>The + selector is used to select an element that is directly after another specific element.</p>
<p>The following example selects the first p element that are placed immediately after div elements:</p>

<div>
  <p>Paragraph 1 in the div.</p>
  <p>Paragraph 2 in the div.</p>
</div>

<p>Paragraph 3. After a div.</p>
<p>Paragraph 4. After a div.</p>

<div>
  <p>Paragraph 5 in the div.</p>
  <p>Paragraph 6 in the div.</p>
</div>

<p>Paragraph 7. After a div.</p>
<p>Paragraph 8. After a div.</p>

</body>
</html>
The Adjacent Sibling Selector is used in the HTML code above along with the subsequent code.
div + p {
  background-color: #7667e4;
}
Output:
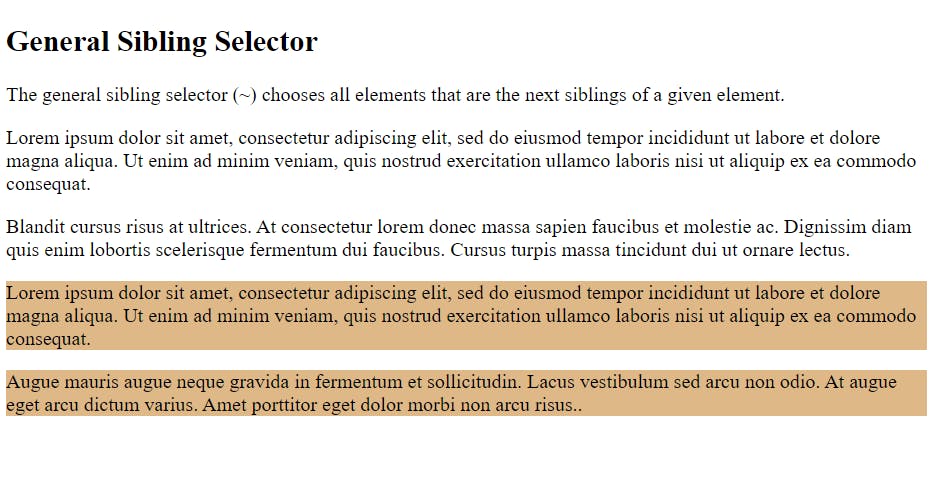
7.2 General Sibling Selector (~)
The general sibling selector chooses all elements that are the next siblings of a given element.
<!DOCTYPE html>
<html>
<head>
<style>
div ~ p {
  background-color: burlywood;
}
</style>
</head>
<body>

<h2>General Sibling Selector</h2>

<p>The general sibling selector (~) chooses all elements that are the next siblings of a given element.</p>

<p>Lorem ipsum dolor sit amet, consectetur adipiscing elit, sed do eiusmod tempor incididunt ut labore et dolore magna aliqua. Ut enim ad minim veniam, quis nostrud exercitation ullamco laboris nisi ut aliquip ex ea commodo consequat.</p>

<div>
  <p>Blandit cursus risus at ultrices. At consectetur lorem donec massa sapien faucibus et molestie ac. Dignissim diam quis enim lobortis scelerisque fermentum dui faucibus. Cursus turpis massa tincidunt dui ut ornare lectus.</p>
</div>

<p>Lorem ipsum dolor sit amet, consectetur adipiscing elit, sed do eiusmod tempor incididunt ut labore et dolore magna aliqua. Ut enim ad minim veniam, quis nostrud exercitation ullamco laboris nisi ut aliquip ex ea commodo consequat.</p>

<p>Augue mauris augue neque gravida in fermentum et sollicitudin. Lacus vestibulum sed arcu non odio. At augue eget arcu dictum varius. Amet porttitor eget dolor morbi non arcu risus..</p>

</body>
</html>
The General Sibling Selector is used in the HTML code above along with the subsequent code.
div ~ p {
  background-color: burlywood;
}
Output:
8. Pseudo-elements Selector
To style certain areas of an element, we use a CSS pseudo-element. it can be put to use for style the element's initial letter or line, Insert content before, or after, the content of an element
Syntax: The syntax is :
selector::pseudo-element {
  property: value;
}
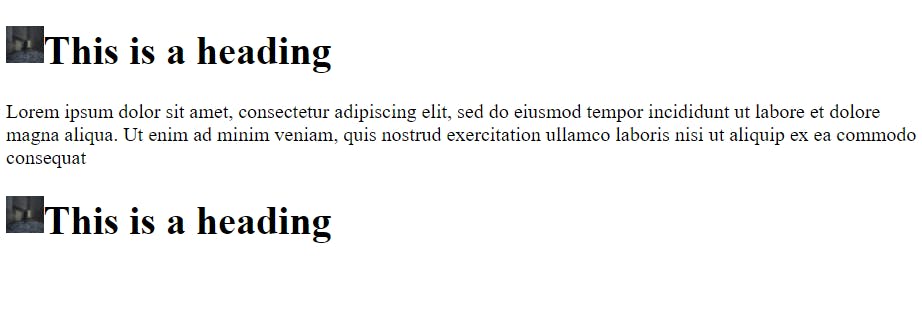
8.1 The ::before Pseudo-element
To place content before the content of an element, we use the before pseudo-element.
<!DOCTYPE html>
<html>
<head>
<style>
h1::before {
  content: url(https://placeimg.com/30/30/any);
}
</style>
</head>
<body>

<h1>This is a heading</h1>

<p>Lorem ipsum dolor sit amet, consectetur adipiscing elit, sed do eiusmod tempor incididunt ut labore et dolore magna aliqua. Ut enim ad minim veniam, quis nostrud exercitation ullamco laboris nisi ut aliquip ex ea commodo consequat</p>

<h1>This is a heading</h1>

</body>
</html>
The before Pseudo-element Selector is used in the HTML code above along with the subsequent code.
h1::before {
  content: url(https://placeimg.com/30/30/any);
}
Output:
8.2 The ::after Pseudo-element
To place content after the content of an element, we use the after pseudo-element.
<!DOCTYPE html>
<html>
<head>
<style>
h1::after {
  content: url(https://placeimg.com/40/40/any);
}
</style>
</head>
<body>

<h1>This is a heading </h1>
<p>Lorem ipsum dolor sit amet, consectetur adipiscing elit, sed do eiusmod tempor incididunt ut labore et dolore magna aliqua. Ut enim ad minim veniam, quis nostrud exercitation ullamco laboris nisi ut aliquip ex ea commodo consequat.</p>

<h1>This is a heading </h1>

</body>
</html>
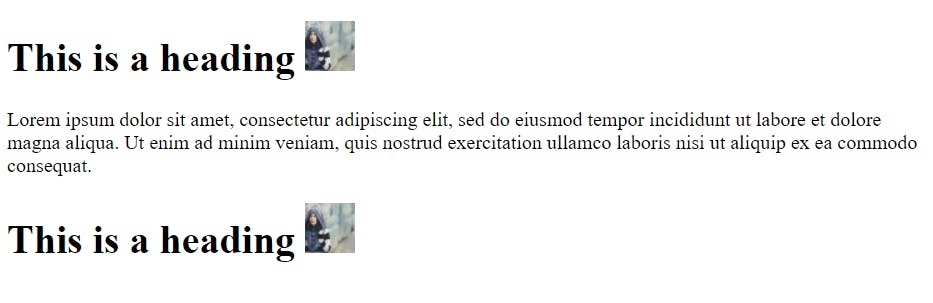
The after Pseudo-element Selector is used in the HTML code above along with the subsequent code.
h1::after {
  content: url(https://placeimg.com/40/40/any);
}
Output:
We have now finished talking about Selectors in CSS. If you have read this far, I sincerely appreciate it. Please share your thoughts.